மேசைகளை உருவாக்குதல் (Creating tables)
டைன்-இன் (Dine-in) ஆர்டர்களைத் திறம்பட நிர்வகிக்க, மெர்ச்சன்ட் ஆப்பில் மேசைகளை (Tables) எவ்வாறு இயக்குவது மற்றும் உருவாக்குவது என்பதை இந்த வழிகாட்டி விளக்குகிறது.
முன்நிபந்தனைகள் (Prerequisites)
- நீங்கள் மெர்ச்சன்ட் ஆப்பில் Settings / Table Management பிரிவை மாற்றும் அணுகல் (Edit access) கொண்ட கணக்கில் லாகின் செய்திருக்க வேண்டும்.
- (விருப்பத்தேர்வு) ஏசி மற்றும் ஏசி அல்லாத இடங்களுக்குத் தனித்தனி விலைகளை அமைக்க விரும்பினால், நீங்கள் பல ஆர்டர் வகைகளை உருவாக்கி, தயாரிப்புகளுக்குப் பல விலைகளை (Multi-price) நிர்ணயிக்க வேண்டும்.
இதற்கு பல விலை அமைப்பு வழிகாட்டியைப் பார்க்கவும்.
படி 1: டேபிள் செட்டிங்ஸ் (Table settings) திறக்கவும்
- மெயின் மெனுவில், Settings → Store என்பதற்குச் செல்லவும்.
- ஸ்டோர் செட்டிங்ஸ் பக்கத்தில் Tables என்பதைத் தேடவும்.
- Tables ஆப்ஷனை 'Enable' செய்யவும்.
- இப்போது மெயின் மெனுவில் தோன்றும் Table ஆப்ஷனை கிளிக் செய்யவும்.
படி 2: புதிய மேசையைச் சேர்த்தல்
-
மெயின் மெனுவில் உள்ள Table என்பதை கிளிக் செய்யவும்.
-
Create Table பொத்தானை கிளிக் செய்யவும்.
-
இப்போது Create Table படிவம் (Form) அல்லது விண்டோ திறக்கும்.
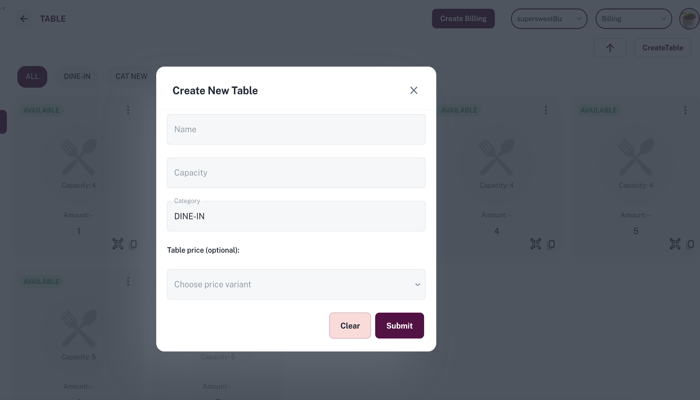
படி 3: மேசை விவரங்களை உள்ளிடவும்
Table form-இல் கீழ்க்கண்டவற்றை நிரப்பவும்:
- Table Name / No: மேசைக்கான ஒரு தனித்துவமான பெயர் அல்லது எண்ணை உள்ளிடவும் (உதாரணமாக: T1, T2, Garden-1).
- Capacity: இந்த மேசையில் எத்தனை பேர் அமரலாம் என்பதை உள்ளிடவும் (உதாரணமாக: 4, 6).
- Category: மேசையின் வகையை (Category) தேர்ந்தெடுக்கவும் (இயல்பாக DINE-IN என்று இருக்கும்). நீங்கள் தேவைப்பட்டால் புதிய வகைகளை (உதாரணமாக: AC, Non-AC, Rooftop) உருவாக்கிக்கொள்ளலாம்.
படி 4: மேசைக்கான விலையை அமைத்தல் (விருப்பத்தேர்வு)
இந்த மேசை எந்த price variant (விலை வகை) சார்ந்தது என்பதைத் தேர்ந்தெடுக்கவும். சாதாரண விலையே பொருந்தும் என்றால், இந்தப் பகுதியை காலியாக விட்டுவிடலாம்.
படி 5: மேசையைச் சேமிக்கவும்
- மேசை பெயர், அளவு மற்றும் வகையைச் சரிபார்க்கவும்.
- மேசையை உருவாக்க Submit பொத்தானை கிளிக் செய்யவும்.
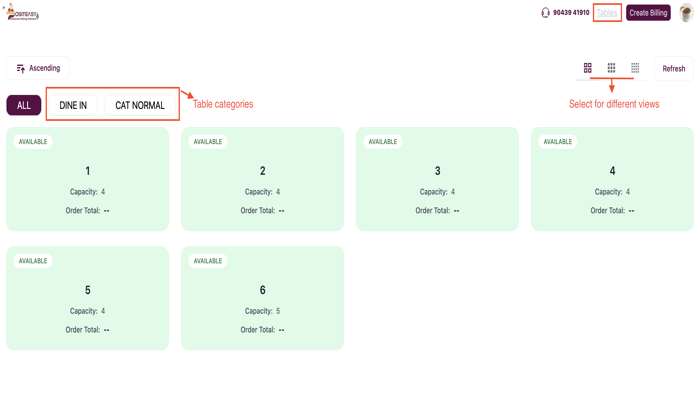
படி 6: ஸ்டாஃப் ஆப்பில் சரிபார்த்தல்
-
Staff App-ஐ 'Refresh' மற்றும் 'Sync' செய்யவும்.
-
Tables பிரிவில் நீங்கள் உருவாக்கிய புதிய மேசை (உதாரணமாக: T1) தோன்றுவதை உறுதிப்படுத்தவும்.